Boost Your Home's Appeal With a Feature Wall

Revive Painting • October 26, 2025

Feature walls have become one of the best ways to change a room without a complete renovation. Walking through Saskatoon's homes, I'm always amazed at how a single accent wall can dramatically alter any space's size, shape, and feel. A well-designed accent wall stands out from surrounding walls with its unique color, shade, design, or material. This design technique adds instant visual interest and ties your color scheme together perfectly when you want to refresh your living room or create a stunning bedroom feature.

Feature walls look great in any home, whatever your decorative style. We've seen these walls work beautifully with both neutral and bold color palettes across Saskatoon's neighborhoods, from Nutana's historic homes to Stonebridge's modern developments. Your room can feel larger with an accent wall that provides the perfect color pop to lift your entire space. Most homeowners choose to place accent walls behind beds or sofas - natural focal points that anchor the room's furnishings. Saskatoon homeowners can make one of the most affordable and dramatic improvements to their home's interior with a well-planned feature wall.


Choosing the Right Wall for Maximum Impact


The right wall choice makes a vital difference in creating maximum visual effect in your Saskatoon home. Your chosen wall should have a clear purpose in your space. This isn't just about adding color. You need to create a thoughtful focal point that makes your entire room better. The right accent wall can change your living space completely, whether you own a character home in City Park or a modern build in Evergreen.


Look for natural focal points


Great feature walls make existing attention-grabbing elements in your room even better. Our years of painting Saskatoon homes have taught us that the best accent walls highlight a room's natural focal point, such as a fireplace, built-in bookcase, or artistic display. You can find your room's natural focal point easily. Step back when you enter and see where your eyes go first. Your master bedroom's wall behind the bed or your living room fireplace's surrounding area could be perfect spots. Your Saskatoon home might not have standout architectural features. You can still create one by picking a wall that matches your room's purpose and layout.


Avoid awkward or asymmetrical walls


Saskatoon homeowners often pick walls with irregular shapes or awkward setups. This creates visual confusion instead of the striking effect you want. Feature walls look best with clean, simple rectangular shapes that don't fight with other room elements. Stay away from walls that have slanted ceilings, odd window setups, or uneven shapes. Symmetry plays a key role in creating balance. Even distribution of wall elements helps the accent color enhance existing features instead of taking away from them. Our painting projects across Saskatoon show that walls with inside corners on both sides create the most attractive results.


Consider lighting and room size


Light's interaction with your feature wall often gets overlooked in design choices. Saskatoon's northern climate brings dramatic changes in natural light between seasons. This makes light's effect on your space really important. Natural sunlight through windows can clarify your walls' true colors and make them look vibrant and welcoming. Artificial lighting changes how wall colors look too. Warm-toned bulbs create coziness, while cooler-toned lights make colors look crisper.


Your room's size should guide your feature wall choice. Smaller rooms in Saskatoon's older neighborhoods need specific approaches, unlike larger spaces. To cite an instance, contrast adds dimension and depth to a room and might make it feel larger. Our experience painting Saskatoon homes of all sizes shows that cooler colors make spaces seem bigger, while warmer colors add coziness. Small spaces need careful planning with accent walls. They can break up the room visually and make it feel even smaller.


Design Techniques That Make a Feature Wall Stand Out


Your perfect feature wall starts with finding the right spot in your Saskatoon home. Let's take a closer look at design techniques that will make your accent wall stand out. A stunning feature wall needs more than just a different paint color—it needs thoughtful design choices that boost your space and show your personality.


Use bold paint colors with purpose


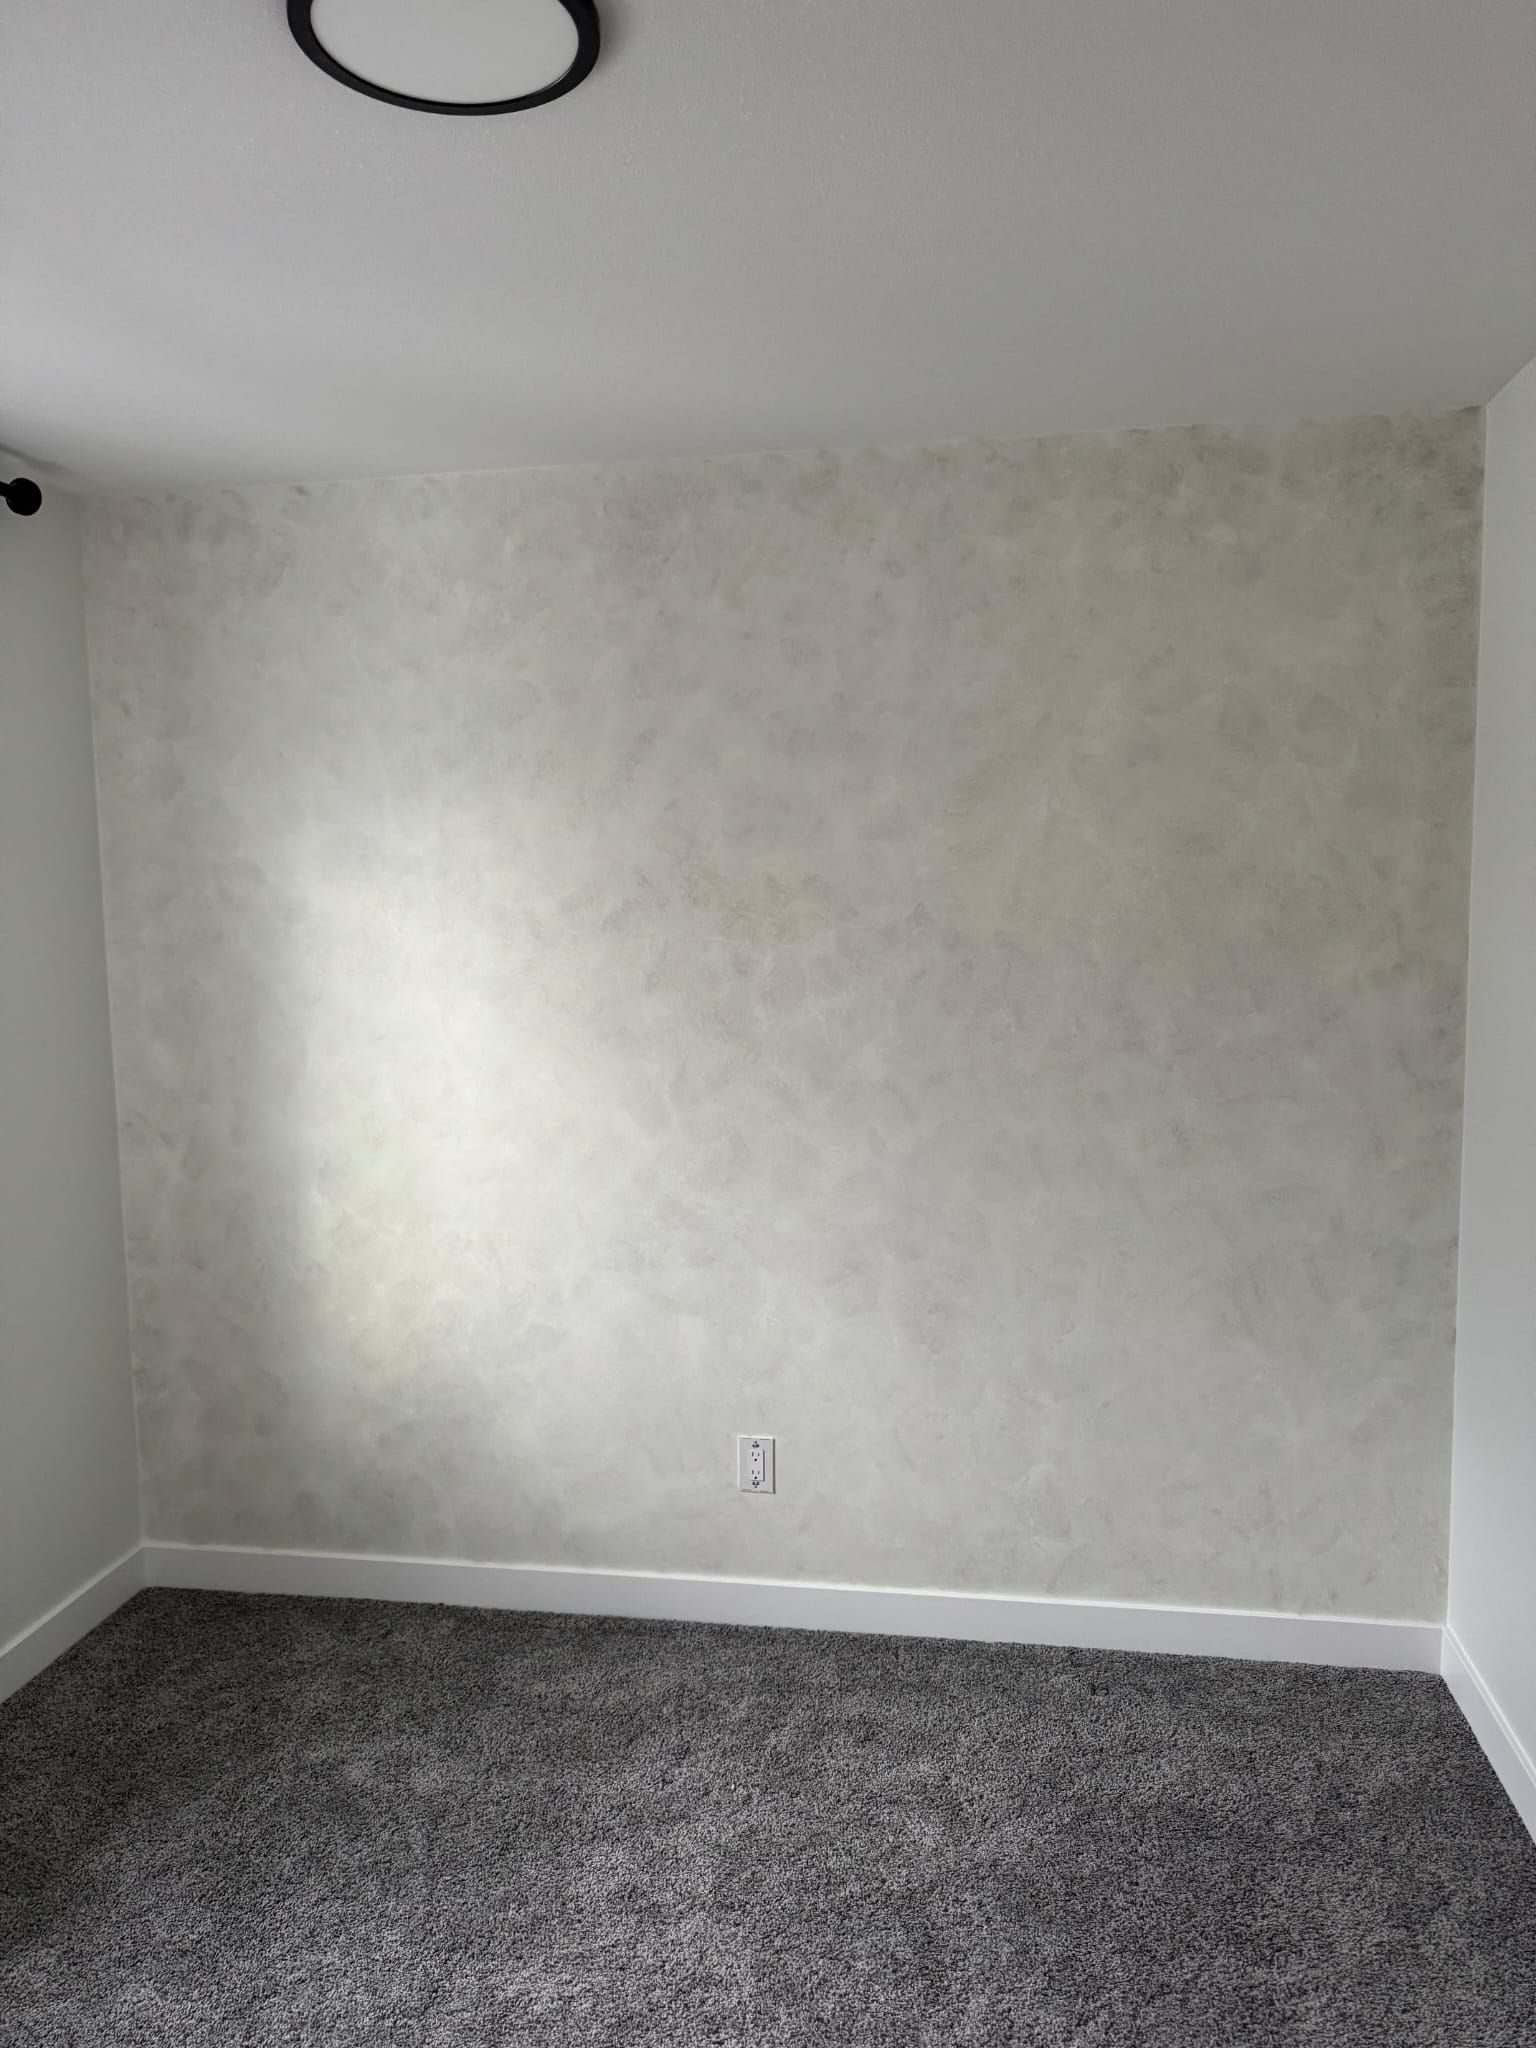
Your feature wall's color should have a clear design goal. The color you pick must create the right visual contrast with your existing décor. Light-colored accent walls work best in Saskatoon homes with darker surrounding walls, while deeper, bolder shades work great in bright spaces. Note that accent colors should catch the eye and create visual interest. Homeowners in Saskatoon's various neighborhoods have found that the best feature walls avoid harsh contrasts with nearby walls. Colors with similar undertones create a more unified, flowing look.


Incorporate molding or paneling


Wood paneling and decorative molding can lift a basic feature wall into something extraordinary. Well-placed trim adds depth that paint alone can't deliver. This approach shines in Saskatoon's character homes. The molding complements baseboards and door casings while adding visual interest without dominating the room's design. You can arrange molding in different ways—from traditional evenly-spaced panels to modern designs with sleek lines. The detailed trim work highlights architectural elements like fireplaces, making them natural focal points. Saskatoon homeowners can create an upscale look on a budget with thin molding strips that form narrow panels.


Try geometric or ombré paint effects


Geometric patterns and ombré effects are two eye-catching approaches we've brought to homes throughout Saskatoon. Geometric patterns range from bold and modern to subtle and refined, depending on your desired atmosphere. Triangles, rectangles, and hexagons excel at highlighting specific areas—picture a large triangle behind your sofa as a centerpiece. Ombré walls blend three or more colors in a gradient that showcases your chosen color scheme. This style creates magic in Saskatoon children's bedrooms, where gentle color transitions create playful yet elegant spaces.


Accent the ceiling or doors


Your ceiling—the "fifth wall"—provides an unexpected canvas that many Saskatoon homeowners miss. A bold ceiling color adds drama to the classic accent wall concept. Your feature wall can extend to nearby doors to create a seamless look. Plaid patterns or floral wallpaper on ceilings can connect wall colors with your room's design elements. Saskatoon's northern location means varying daylight hours, and ceiling accents help brighten spaces during long winters by reflecting light in unique ways.


Material Options Beyond Paint


Paint remains a popular choice for feature walls in Saskatoon homes, but learning about other materials can help you create unique and textured focal points. Our years of serving Saskatoon homeowners have shown us how these materials can raise living spaces and leave lasting impressions that paint alone can't match.


Wood paneling and shiplap


Natural wood elements add unmatched warmth and character to Saskatoon interiors. Shiplap has become a versatile wall treatment that works beyond farmhouse décor and softens modern and minimalist styles. Traditional 6-inch wide boards are common, but different widths can give your feature wall a contemporary look. We've installed extra-wide boards in Saskatoon's newer neighborhoods like Evergreen and Brighton to give homes a modern yet welcoming feel. Vertical tongue-and-groove paneling makes areas feel larger by drawing the eye upward - perfect for many Saskatoon homes with lower ceilings. Pine shiplap is budget-friendly (CAD 2.09 to CAD 5.57 per linear foot), while cedar lasts longer and naturally resists our Saskatoon climate (CAD 4.18 to CAD 9.75 per linear foot).


Stone, brick, or tile finishes


Natural stone feature walls give Saskatoon spaces an unmatched elegance and authenticity. Natural stone veneer panels have made this luxury more available. They install just like tile with no grout needed—you simply dry stack and stagger the panels. We've created beautiful brick accent walls in Saskatoon's River Heights and City Park neighborhoods that serve as visual anchors and add texture without overwhelming the space. Sealed brick veneer works great in kitchens because it resists moisture and staining. Ceramic and porcelain tiles are very durable, hypoallergenic, and fireproof—perfect for Saskatoon's changing seasonal conditions. Revive Painting and Wallpaper in Saskatoon can help you professionally install these durable stone and tile options.


Wallpaper and peel-and-stick murals


Wallpaper has made an impressive comeback in Saskatoon homes and offers a simple way to change an entire room quickly. Modern options include removable wall murals that create stunning artwork scenes. We've installed baroque stripes in Saskatoon's historic Nutana neighborhood to make living rooms feel taller, while Art Deco patterns bring style to heritage homes. Vinyl wallpaper suits Saskatoon kitchens and dining rooms perfectly because it handles moisture well and stands up to our climate's humidity changes.


Fabric and textile wall treatments


Fabric wall treatments give Saskatoon homeowners a luxurious way to soften room acoustics while adding color and coziness. The standard method uses a frame around the wall perimeter, including cornices and skirting, then adds padding before stretching fabric across and finishing with decorative braid. We've installed fabric panels in Saskatoon's newer condo developments that provide great sound insulation—especially when you have open-concept spaces. Silk creates a rich look that's perfect for formal dining rooms, while plain linen adds peace and intimacy to bedrooms during our northern winter nights. Natural fibers like lightweight cottons work best in potentially humid Saskatoon spaces because they let walls breathe.


Using Feature Walls to Define Space and Function


Feature walls do more than add visual appeal to Saskatoon homes. They help organize and define spaces while making them more functional. Our experience as professional painters in Saskatoon shows how well-placed accent walls can revolutionize both the appearance and utility of a space. These walls create practical areas that look beautiful and serve a purpose.


Create zones in open layouts


Open floor plans are becoming popular in Saskatoon's modern homes and renovated spaces. These spacious layouts can make it challenging to define different functional areas. Feature walls provide an elegant solution by creating visual separation without physical barriers. We have helped many homeowners across Saskatoon neighborhoods define distinct areas in larger rooms. Strategic accent walls naturally indicate transitions between living, dining, and work zones. This approach works best with other zoning elements like area rugs that outline specific areas. An accent wall at the end of a long rectangular room creates natural endpoints that help our brains recognize different functional zones. Saskatoon homeowners who want to keep their open-concept feeling find accent walls ideal—they define spaces without creating barriers.


Highlight built-ins or shelving


Feature walls with built-in storage solutions serve double duty in Saskatoon's diverse housing market. An accent wall with built-in shelving stores books, decorations, or family photos while acting as a stunning focal point. Wood slat feature walls between windows add warmth and texture to many Saskatoon homes. Homeowners looking to maximize their space benefit from multi-functional feature walls with built-in shelves, cubbies, or hooks. These beautiful yet practical solutions are popular in Saskatoon's older neighborhoods where storage space is limited.


Frame a bed or sofa with a feature wall


The wall behind key furniture pieces creates a meaningful backdrop. Saskatoon bedroom designs often include accent walls behind beds as alternatives to traditional headboards. A modern matte black painted board and batten-style feature wall creates a sophisticated frame. It runs two-thirds up the wall and spans the full width behind the bed, offering a contemporary yet timeless look. This placement makes sense because the wall behind your bed catches your eye first when entering the room. It significantly impacts your bedroom's overall design. Saskatoon homeowners with smaller spaces can combine fitted furniture with a feature wall to create a cozy alcove that frames the bed and maximizes storage.


Camouflage TVs or storage areas


Well-designed feature walls hide necessary but unattractive elements like televisions and storage areas. Dark-background feature walls help TVs blend in when not in use in many Saskatoon homes. Bold feature walls effectively hide TVs in homes with maximalist décor, helping them become part of the background instead of the room's focal point. Saskatoon homeowners often choose custom joinery with hinged doors that stack back to reveal screens when needed. These designs turn practical elements into artistic features. Spaces can naturally switch between formal living rooms and casual family entertainment areas. Feature walls with hidden storage help smaller Saskatoon homes maximize space while maintaining a clean, uncluttered look that balances style and function.


Tips to Keep Your Accent Wall Timeless


A timeless feature wall needs more than trendy colors or materials - it requires careful planning. Saskatoon homeowners can make their accent walls stylish for years by following some basic design principles.


Coordinate with your room's color palette


Your feature wall's timeless appeal depends on how well it fits your overall color scheme. Professional painters in Saskatoon recommend the classic 60-30-10 Rule. This rule suggests using 60% dominant color, 30% secondary color, and 10% accent color. Contrast creates visual interest, but your accent wall should go together with the rest of your room instead of clashing with existing decor. Revive Painting and Wallpaper in Saskatoon can help you achieve this balance. Your accent wall color should complement adjacent walls - choosing shades a few steps lighter or darker creates good contrast without looking out of place.


Balance boldness with subtlety


Design longevity comes from balancing statement pieces with restraint. Neutral colors like whites, creams, grays, and muted tones adapt better to changing styles through accessories and furnishings. Our experience with Saskatoon homes shows that bold colors or patterns work best when balanced with subtle elements in the room. This makes it easier to update your space as your style changes without redoing everything.


Avoid overusing the technique


Of course, feature walls make powerful design statements, but keeping them limited preserves their effect. Interior designers suggest using just one accent wall per room for a balanced, cohesive look. Multiple feature walls in one space compete for attention and can make your Saskatoon home look disconnected. Each accent wall needs a clear purpose - it should highlight architectural features or define specific areas rather than just look decorative.


Update accessories to refresh the look


The most economical way to keep your feature wall relevant is through well-chosen accessories. Saskatoon's changing seasons give you opportunities to switch textiles and decor items without repainting. Your priorities and desired mood play the most important role in keeping your feature wall current. Adding artwork or mirrors brings personality to your feature wall while letting you make periodic updates that match your evolving taste. A simple change in lighting with wall sconces or pendant lights can transform your feature wall's effect and create new focal points as your style changes.


Paint Your Feature Wall


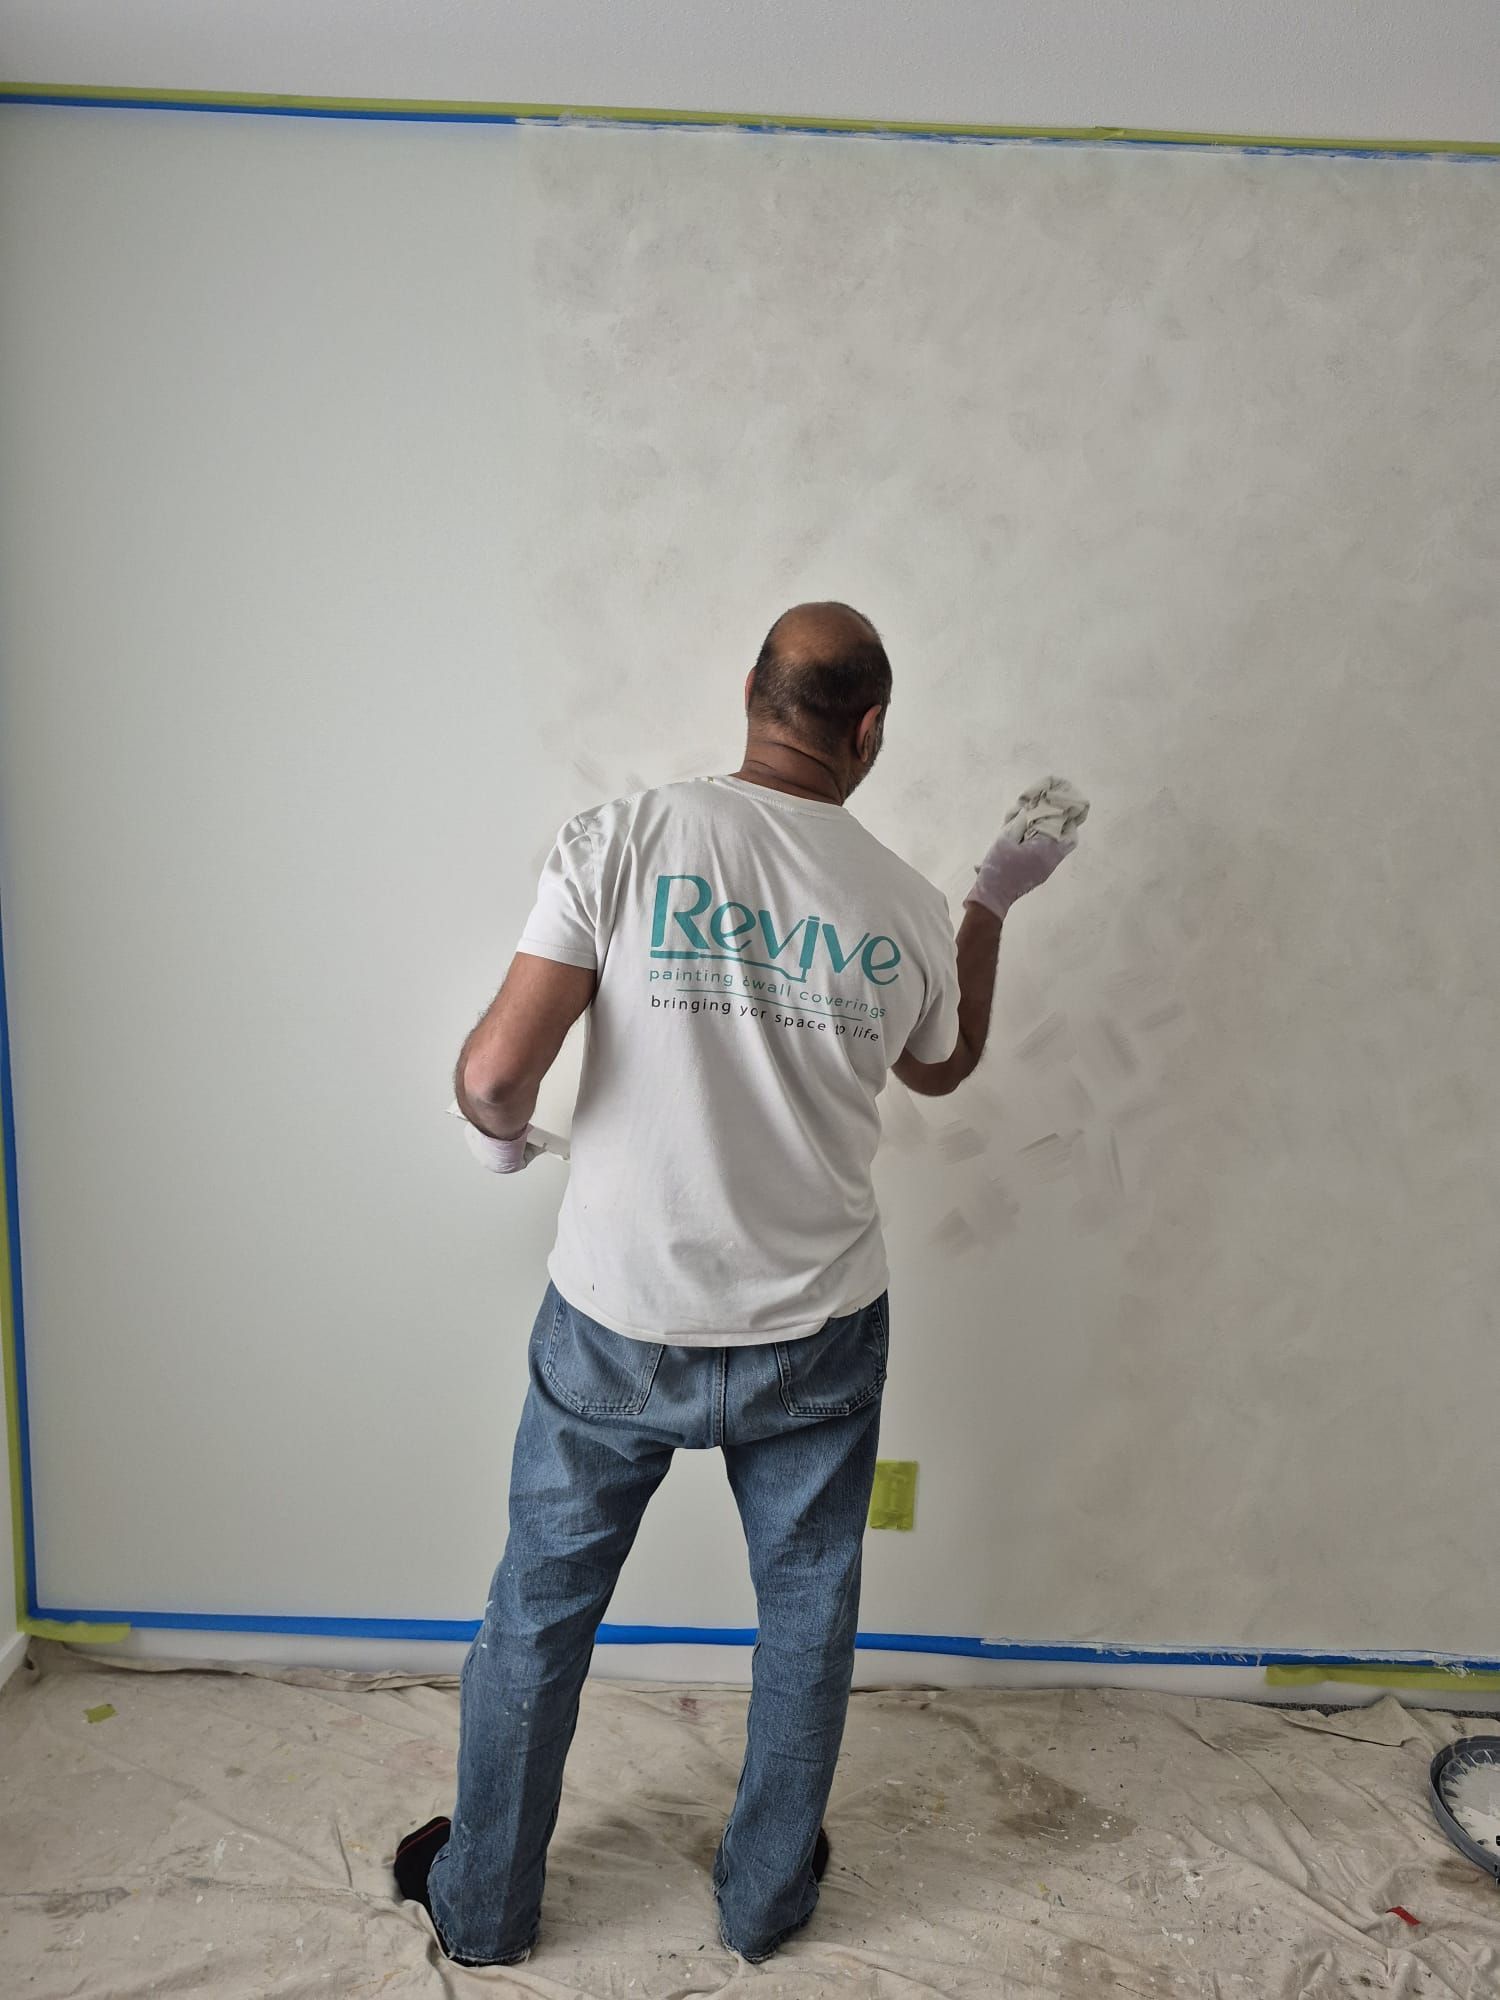
The most rewarding part of creating a feature wall in any Saskatoon home comes when you finally start painting. Our team of professional painters has worked with Saskatoon residents throughout the year, and we've seen how weekend painting projects can change a space completely. These projects add character and visual interest without costing too much. The painting process starts with proper preparation. You'll need to clear furniture from the room, place drop cloths near baseboards, and ensure good ventilation by opening windows or doors. A thorough wall cleaning with appropriate cleaner removes oil, grease, or contamination that might affect paint adhesion.


First-time Saskatoon homeowners should apply painter's tape carefully along trim, baseboards, ceilings, and adjacent walls to achieve clean, professional edges. You can prevent bleeding by pressing the tape firmly with a putty knife or credit card. The right paint supplies make all the difference. You'll need a 9-inch roller frame, roller cover with ¾-inch nap, paint tray with liner, and a quality paint brush for detail work.


Most accent walls in Saskatoon need just one gallon of premium paint to cover two coats, and you'll likely have paint left over. Paint should be applied in "W" shapes to avoid streaks. Let each coat dry for three hours and keep ceiling fans running on low speed to help the drying process. Homeowners across Saskatoon's neighborhoods from Stonebridge to Evergreen have found that accent walls offer great value. Smaller walls need just a quart of paint (CAD 20.90-CAD 48.77) while larger walls require a gallon (CAD 34.83+). Your newly painted feature wall will immediately raise your Saskatoon home's interior design value.


feature wall
Brian painting interior feature wall
Saskatoon house with heavy snow causing paint damage
By Revive Painting April 20, 2026
How Saskatoon's Freeze-Thaw Cycle Damages Exterior Surfaces Saskatoon 's climate subjects painted surfaces to repeated expansion and contraction as temperatures swing above and below freezing, while moisture infiltration during thaw periods creates internal pressure that compromises paint adhesion and substrate integrity. Ice damming and poorly insulated attics compound these issues by creating uneven temperature zones that accelerate paint breakdown. Understanding the Freeze-Thaw Process in Saskatchewan Saskatchewan's continental prairie climate creates intense freeze-thaw conditions throughout late winter and early spring. When daytime temperatures rise above 0°C, snow melts and water penetrates into microscopic cracks in paint and siding materials. At night, temperatures frequently drop well below freezing, causing this trapped moisture to freeze and expand. This expansion exerts significant force on painted surfaces. Water expands by approximately 9% when it freezes, creating pressure that widens existing cracks and loosens paint from the substrate. The cycle repeats dozens of times each season in Saskatoon, progressively degrading exterior finishes . We see the most severe damage on south and west-facing walls where solar heating accelerates daytime thaw while overnight temperatures still plummet. North-facing surfaces experience less dramatic temperature swings but often retain moisture longer, creating different deterioration patterns. Physics of Snow Melt and Daily Temperature Swings Temperature fluctuations in Saskatoon during spring can exceed 20°C within a 24-hour period. These rapid swings cause painted surfaces to expand when warm and contract when cold. Paint films that have lost flexibility through aging cannot accommodate this movement and develop stress fractures. Snow melt introduces substantial moisture loads to building exteriors. As accumulated snow on roofs and against walls melts, water runs down surfaces and seeks entry points through compromised paint or caulking. Dark-colored paint absorbs more solar radiation, creating localized warm spots that accelerate melt rates and increase moisture exposure. The combination of thermal stress and moisture creates ideal conditions for paint failure . Substrates like wood absorb water during thaw periods and then contract as temperatures drop, creating a mechanical pumping action that forces paint away from the surface. Common Exterior Paint Failures During Thaw Cycles Peeling and blistering are the most visible signs of freeze-thaw damage. Moisture trapped beneath the paint film expands when frozen, breaking the bond between paint and substrate. We observe peeling starting at edges, seams, and areas where water naturally collects. Cracking and alligatoring develop when paint loses elasticity and cannot flex with temperature changes. These patterns create a network of fissures that allow more moisture penetration, accelerating deterioration. Chalking and fading occur as freeze-thaw cycles break down paint binders. The surface becomes powdery and color pigments degrade, particularly on surfaces with maximum sun exposure. Wood substrates show rot and decay when compromised paint allows sustained moisture contact. We identify this by soft spots, discoloration, or visible fungal growth beneath failing paint. Impact of Poorly Insulated Attics and Ice Damming Poorly insulated attics create temperature differentials that contribute to ice damming on roof edges. Heat escaping through inadequate insulation warms roof surfaces, melting snow that then refreezes at cooler eaves. This ice buildup forces water under shingles and behind fascia boards, saturating painted trim and soffits. Ice damming causes water to pool against exterior surfaces for extended periods. This prolonged exposure allows deep moisture penetration into paint and substrate materials. We find that homes with ice damming consistently show accelerated paint failure on eaves, fascia, and upper wall sections. The freeze-thaw damage from ice damming extends beyond roof lines. Overflowing gutters and ice buildup direct water onto wall surfaces not designed for heavy moisture exposure, creating premature paint breakdown and potential structural damage to underlying materials. Warning Signs You Need to Repaint After a Freeze-Thaw Season Saskatoon's freeze-thaw cycles leave visible marks on exterior paint that signal when protection has failed. We can spot these issues by examining paint surfaces, tracking moisture patterns after snow melt, and checking how water moves away from our homes. Cracking, Peeling, and Bubbling Paint Cracking appears when paint loses flexibility during repeated expansion and contraction. We see hairline cracks that run horizontally along siding or larger splits that expose bare wood or substrate underneath. Peeling starts at edges where moisture works behind the film. South and west walls show this first because UV weakens the bond before winter stress arrives. When we spot paint lifting in sheets or curling at seams, the coating no longer protects what's beneath. Bubbling forms when trapped moisture turns to vapor or ice crystals push the film outward. These blisters feel soft when pressed and often cluster near joints, bottom courses of siding, or areas where snow piles against walls. Once bubbles break open, water enters freely and accelerates decay. Discoloration, Stains, or Fading After Snow Melt Vertical streaks and rust-colored stains appear when snow melt carries dirt, salts, and oxidized metals down painted surfaces. We notice these marks most clearly in spring when snow banks recede and reveal what winter left behind. Fading shows up as uneven color, especially on south-facing walls that take the most sun. Chalky residue on our fingers when we touch the surface means the binder has broken down. This powder no longer holds pigment in place or sheds water effectively. Water stains near the foundation or around windows indicate where moisture sat too long during thaw cycles. Dark patches on stucco or wood signal that the substrate stayed wet and the paint barrier failed. Moisture Intrusion and Its Effects on Exterior Paint Moisture travels into gaps opened by freeze-thaw movement. We find it behind paint at caulk lines that have pulled away, at the bottom of siding where end grain absorbed meltwater, and where flashing no longer diverts rain. Paint blisters, softens, or loses adhesion when water sits between the coating and substrate. Wood begins to rot, stucco develops efflorescence, and metal corrodes. These problems spread quickly once moisture breaches the film. We check shaded elevations and north walls that dry slowly after snow melt. Damp spots that remain visible days after rain or thaw tell us water is trapped and moving through the wall assembly. Addressing Drainage Issues: Downspouts, Sump Pumps, and Floor Drains Downspouts must carry water at least 1.8 meters away from the foundation. When they dump near walls, splash-back soaks lower siding and paint fails at the bottom courses. We inspect extensions after spring thaw to ensure they remain connected and grade properly. Properly functioning sump pumps and floor drains keep basements dry, which protects interior conditions that affect exterior paint performance. High indoor humidity from a failing sump pump migrates outward through walls and pushes paint off from behind. Snow melt pooling near the house signals grading problems or clogged drains. We look for: Ice dams at eaves that force water under paint Standing water against foundation walls Downspout discharge frozen or blocked Grade sloping toward the building instead of away When drainage fails, paint takes on more moisture than it was designed to handle and deteriorates within one or two freeze-thaw seasons. Is this your home? Let us know! Contact us today to help.
repainting team in Saskatoon
By Revive Painting April 10, 2026
Defining a Full Repaint vs. Touch-Ups: What's the Right Approach? A full repaint covers your entire exterior with fresh coats of paint, while touch-ups address specific areas of damage or wear. The right choice depends on the extent of damage, your budget, and how long you expect the results to last. What a Full Repaint Involves A full repaint means applying a fresh coat of paint to your entire exterior surface. This process typically starts with thorough surface preparation, including power washing, scraping off loose or peeling paint , and sanding rough areas. Your painter will prime any bare wood or damaged areas before applying two coats of high-quality exterior paint . For commercial painting projects, this might also include coordinating colors across multiple buildings or sections. The process takes significantly more time than touch-ups. Expect anywhere from several days to a few weeks depending on your home's size and the weather conditions. Full repainting delivers uniform color and sheen across all surfaces. You won't see any mismatched areas or color variations that often occur with touch-ups. This approach also provides maximum protection against weather, moisture, and UV damage. Understanding Touch-Up Painting Touch-up painting targets isolated areas where damage has occurred. This includes small sections with chipping, peeling, or fading paint. The process involves cleaning the damaged area, scraping away loose paint, and feathering the edges. You then apply primer to any bare spots and carefully paint over the repair with matching paint. The biggest challenge with touch-ups is color matching. Even if you have leftover paint from your original job, weathering and UV exposure cause exterior paint to fade over time. Your touch-up may stand out against the surrounding surface. Touch-ups work best when your overall paint job is less than five years old and damage is limited to a few small areas. They make sense for minor scrapes, small chips from hail or debris, or isolated peeling around specific trim pieces. Cost Comparison: Full Repaint vs. Touch-Ups Touch-ups cost substantially less than full repainting in the short term. Small repair jobs might run a few hundred dollars, while a complete exterior repaint can cost several thousand depending on your home's size. However, cost comparison becomes more complex when you factor in longevity. Touch-ups on aging paint often fail within a year or two, requiring repeated repairs. You might end up spending more on multiple touch-up sessions than you would have on one complete repaint. Full repainting delivers better value for your investment in these situations: Paint is over 8-10 years old Damage covers more than 20% of surfaces You're planning to sell and need to maximize curb appeal Color has faded unevenly across different exposures Touch-ups make financial sense when paint is relatively new, damage is minimal, and you don't need perfect color consistency for first impressions. Key Signs Your Exterior Needs a Complete Repaint When paint starts to fail across multiple areas of your home, touch-ups won't solve the underlying problem. Widespread fading, peeling that exposes bare substrate, or moisture damage indicate your exterior has reached the end of its protective lifespan and needs full attention. Fading, Chalky, and Uneven Colour Paint fade happens when UV rays break down the pigments and binders in your exterior coating. You'll notice this most on south and west-facing walls that receive the heaviest sun exposure throughout the day. Chalking occurs when the paint's surface deteriorates into a powdery residue. Run your hand along the siding—if you see a dusty film on your palm, the protective layer has degraded. This is a clear sign the coating can no longer shield your home from the elements. Color inconsistency across different elevations tells you that some sections have aged faster than others. When touch-ups can't blend properly because the existing paint has faded too much, you're looking at a full repaint. Trying to match new paint to severely weathered surfaces creates a patchy appearance that draws attention rather than fixes it. Peeling Paint, Flaking, and Paint Failure Peeling paint is the most obvious indicator of complete paint failure. When paint loses adhesion and lifts away from the surface in curls or sheets, moisture has gotten behind the coating. This exposes your siding or trim to direct weather damage. Flaking paint appears as small chips breaking off the surface. Unlike minor cracking, flaking indicates the bond between paint layers or between paint and primer has broken down. This type of failure spreads quickly once it starts. When you see bare substrate showing through in multiple locations, your paint system has stopped protecting your home. Wood, fiber cement, or other materials left exposed will deteriorate rapidly. A full repaint with proper primer application is necessary to restore the protective barrier your exterior needs. Moisture Problems: Mildew, Wood Rot, and Biological Growth Mildew and biological growth appear as dark stains or fuzzy patches on painted surfaces. These organisms thrive where moisture intrusion has compromised the paint's ability to shed water. The growth itself can eat through paint and damage the surface beneath. Wood rot develops when moisture reaches bare or poorly protected wood. You'll notice soft spots, crumbling edges, or areas that feel spongy when pressed. Once rot sets in, siding repair becomes necessary before any painting begins. Moisture problems reveal themselves through bubbling paint, water stains, or persistent dampness after rain. These issues require an honest assessment of both the paint system and the underlying materials. Surface prep must address all moisture damage, or new paint will fail just as quickly. When Surface Prep and Repairs Matter Most Paint age determines how much scraping and prep work your exterior needs. Paint older than 10-12 years typically requires extensive preparation across the entire surface, not just problem spots. The coating has weathered to the point where partial fixes won't hold. Surface prep becomes critical when you're dealing with multiple layers of old paint, especially if previous coats are peeling or incompatible. Proper scraping removes all loose material down to a sound surface. Skipping this step means new paint has nothing stable to grip. Siding repair must happen before painting begins. Rotted boards, damaged trim, or failing caulk joints need replacement or restoration. Painting over these issues only hides them temporarily while the damage continues underneath. When Touch-Ups or Partial Repaints Are Enough Touch-up painting and partial repaints make sense when damage is isolated and your existing paint film remains in good condition. The key is knowing which situations call for spot repairs versus a complete exterior overhaul. Dealing with Localized Damage Touch-ups work best for small areas of damage that haven't spread across your siding. Look for isolated chips from hail, scratches from branches, or minor blistering in contained spots. These repairs typically cover less than 10% of a single wall surface. You can address localized damage effectively when the surrounding paint shows no signs of chalking, cracking, or severe fading. The existing coating should feel smooth and intact, not brittle or flaking. Check that the damage hasn't penetrated through multiple paint layers to bare substrate. Impact damage from lawn equipment, bike handles, or sports equipment represents ideal candidates for touch-ups. Similarly, areas around recently replaced trim boards or patched siding sections need only spot treatment when the rest of the wall remains sound. Color Matching and Partial Wall Repairs Color matching becomes challenging once exterior paint ages beyond two to three years. UV exposure causes gradual fading that you might not notice until you apply fresh paint next to it. West-facing walls experience the most severe fading due to intense afternoon sun exposure. Factors affecting color matching success: Paint age : Paint less than 2 years old matches more reliably Sheen level : Flat finishes blend better than satin or semi-gloss Sun exposure : North-facing walls retain color better than southern or west-facing walls Original paint quality : Premium paints fade more uniformly You should consider repainting entire walls rather than spot-treating when repairs exceed a few square feet. Paint stores can color-match aged paint, but the fresh coating will still have different reflective properties than weathered surfaces. This creates noticeable patches even when the color appears identical in the can. Material Considerations: Siding Types and Paint Longevity Different siding materials hold paint for varying lengths of time, affecting whether touch-ups remain viable. Fiber cement siding typically holds paint 12-15 years and accepts touch-ups well throughout its lifespan. Wood siding requires more frequent attention but responds favorably to partial repairs when properly prepared. Vinyl siding doesn't need paint but can be painted. Once painted, it tends to peel in sheets rather than isolated spots, making touch-ups ineffective. Aluminum siding holds paint 8-10 years and can be touched up successfully if the underlying metal hasn't corroded. Wood siding shows the most variation. Cedar and redwood contain natural oils that can bleed through touch-ups if you don't apply proper primer. Pine and fir accept touch-ups more readily but may show texture differences between old and new paint layers. Risks of Delaying or Skipping a Full Repaint Choosing touch-ups when you need full repainting accelerates overall deterioration. Unprotected areas continue degrading while you maintain small sections, leading to substrate damage that increases future repair costs. Wood rot, moisture intrusion, and insect damage spread from exposed areas. You risk doubling your expenses when inadequate touch-ups fail within 1-2 years. The paint film surrounding your repairs continues aging, creating new problem areas that require attention. This cycle of repeated partial fixes costs more than addressing the entire surface at once. Failed touch-ups also create adhesion problems for future coatings. Multiple paint layers of different ages bond differently to the substrate, causing premature peeling when you eventually repaint. Your contractor must then spend additional time sanding and scraping these problematic transitions. Let us help! Contact us today to tell us the scenario of your home.